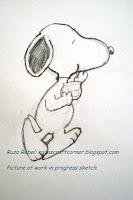
When my husband saw my Paper Smooches Monster Birthday card last month, he reminded me that Paul's birthday is on April 11th. Nick saw a Wendy's Happy Meal item with Snoopy on the kitchen counter, and told me that Paul just loves Snoopy. I knew that I wanted to create a one of a kind card for Paul. I don't have any Snoopy stamps / graphics so I created my own. Yes, I drew the Snoopy you are about to see. I cannot claims rights to the "Snoopy" brand, but I can claim rights to this sketch.
The Happy Meal toy my husband saw from Wendy's was a "How to draw Snoopy & Friends".
I didn't use the stencils that were provided in this package, but followed the directions inside the little book on how to draw Snoopy. This next picture is of my original sketch, including all of the eraser marks.
Once I was happy with my sketch I pulled out some Vellum paper and traced over my original sketch with a Copic Multi-liner to get a clean copy.
I then scanned my sketch to create a jpg file that I can use whenever I like. This allows me to change the size as needed, like I did for this card.
I think this turned out nice. I was really happy with the final product, especially since I have not personally tried to sketch anything since I was a teenage. Glad to see I can still draw!
The inside of the card carries the birthday wishes to Paul, and he will be getting some homemade cookies with it.
I hope you enjoy seeing today's post, and would love to hear your thoughts about my work.
Products Spotlight ...
- Stamps: Studio G i-clear Bubble Stamp which I got at Michael's for $1.00, and Lawn Fawn Harold ABC's
- Paper: Paper Studio Black, Bazzill, Paper Studio Black & White Matstack, and Neenah Classic Solar White
- Ink: Copic Multi-Liner, Copic Markers E31 & E42 (to color in cookies), and Tim Holtz Vintage Photo Distress Ink
- Extra: Pure Bubbles & Blick Stickers that I colored Black with my Copic Marker
- Tools: Darice Embossing Brush, and 3D Foam Squares along with my ATG


Comments