Good morning. As promised here is the Tutorial for the Box Card that I shared on April 1st. This will be a long post, so hang in there.


Box Card
Designed for Scor-Pal by ©Ruza Rebel, April 2017
(original found on Splitcoaststampers)

(original found on Splitcoaststampers)

Supply List:
• 12” x 12” Double Sided Design Paper
• White and Pink Cardstock
• MFT Faux Crochet Border
• Nestabilities Small Oval and Small Oval Scalloped Dies

Step 1:
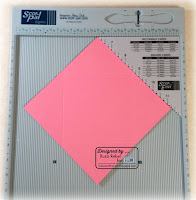
Cut 12” x 12” design paper down to 8-1/2" x 11" and put the extra on the side. Place the 8-1/2" x 11" piece on your Scor-Pal Board with the 8-1/2" at the top (measurements in the above picture are to scale; I used Excel, and Paint to create this photo).
 |
| Photo shown is of the long side (11") |
• Use your bone folder to Score at 2-1/8" and 6-3/8" (black lines)
• Turn your paper one-quarter to the left or right.
• Use your bone folder to Score at 1-1/4", 3-3/8", 7-5/8" and 9-3/4" (red lines, as shown below).

Step 2:
• Use your Bone Folder to fold along the 2-1/8" and 6-3/8" score-line (long side, as shown in the left photo above).
• Unfold, and keeping the side you want to be on the outside of the box facing you. Fold the first score-line (1-1/4") at the top and bottom (short side, as shown in the center photo above).
• Turn paper over and fold the second score-line (as shown in the right photo above).

Step 3:
• Fold next two score-lines to create a square (as shown in the left photo above).
• Take the outer upper corner of the just folded sides, and gently fold it down diagonally to create a triangle using your Bone Folder. Repeat for this part for all 4-sides (as shown in the middle photo above).
• Unfold and you will see your box (as shown in the right photo above).


 Step 6:
 • Wrap the strip around your Card Box leaving a little room for taking it off the Belly Band and putting it back on. Remove Scor-Tape and adhere together.
Once the Card Box was complete I created a card to go inside the box using white cardstock, and the extra design paper.


Using the Scor-Pal Envi Template I made a 4-1/4" Square Envelope for my 4-1/4" Box Card. There is a PDF here with instructions for how to create envelopes.
I stamped part of the kitten on the envelope to coordinate with my Box Card.


• Fold next two score-lines to create a square (as shown in the left photo above).
• Take the outer upper corner of the just folded sides, and gently fold it down diagonally to create a triangle using your Bone Folder. Repeat for this part for all 4-sides (as shown in the middle photo above).
• Unfold and you will see your box (as shown in the right photo above).

Step 4 (optional decorative trim):
• I cut out 2-pieces of decorative trim with my MFT Faux Crochet Border in White cardstock, cut them down to size - approximately 4" each, and adhered 1/8" Scor-Tape the bottom of the die (as shown in the left photo above).
• Miter or trim the 4-corners at a slight angle (as shown in the right photo above).
• Miter or trim the 4-corners at a slight angle (as shown in the right photo above).
• Remove the Scor-Tape and attach the decorative trim to the outside of your box (as shown in the right photo above).

Step 5:
• Turn your box over, outside facing you, and add 1/4" Scor-Tape to the corners like a triangle (as shown above).

 Step 6:
• Remove the Scor-Tape, 1-side at a time, and fold the corners behind the decorative edge (as shown above).
• Repeat this process for the other side of the box.
Step 7 - Make Belly Band:
• Using the "extra design paper" cut it down to 1-/2" x 10".
• Using the "extra design paper" cut it down to 1-/2" x 10".
• Adhere 1/4" Scor-Tap to each corner, one on the outside and one on the inside (as shown in the photo on the left).

Once the Card Box was complete I created a card to go inside the box using white cardstock, and the extra design paper.

I embellished the front of the Belly Band with this adorable kitten. After coloring the kitten with my Copic Markers, I applied it to some Scor-Pal Adhesive Sheet and then used my Nestabilities Oval Dies to cut it out. This was adhered to a Pink Scalloped Oval which I added a strip of Scor-Pal 3/4" Foam Tape to the back, and centered it on the front of my Belly Band.


Using the Scor-Pal Envi Template I made a 4-1/4" Square Envelope for my 4-1/4" Box Card. There is a PDF here with instructions for how to create envelopes.
I stamped part of the kitten on the envelope to coordinate with my Box Card.

I hope you enjoyed the tutorial. If you decide to make one yourself remember to join our Scor-Pal More than One Score Challenge #36 ~ Interactive Project.
Until next time ... Enjoy!
Comments